Thursday, 31 January 2013

How to make your own bag from an old t-shirt!!


STEP ONE

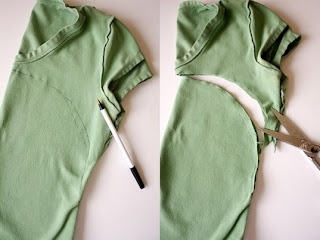
Take an old T-shirt and turn it inside out. Draw a bag shape you like. (You can make it as small or large as you want. 


STEP TWO

Cut through both layers so you have two identical pieces. You can leave the shirt’s hem intact or snip it off.


STEP FOUR

To prevent fraying, either serge or apply a narrow zigzag stitch to the edge.


The finished product


from:http://www.ecouterre.com/recycle-an-old-t-shirt-into-a-produce-grocery-bag-diy-tutorial/

Tuesday, 29 January 2013

Gloss cosmetics

Gloss is a fabulous cosmetic store: they have a great range of nail polish's, eyeshodews and everything else a girl could want!!!

Rating: 5/5

Monday, 14 January 2013

keep calm and be strong


How To Make An Ikat-Inspired iPad Case


What You Need


-Canvas iPad or computer case (ours is from Baggu)
-Colored permanent markers
-Eye dropper
-Rubbing alcohol


Draw Vertical Lines

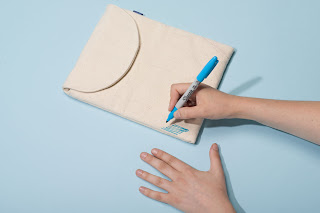
Step 1: Using the blue marker, draw vertical lines next to each other, forming the shape of a zig-zag.


Continue Drawing With Additional Colors

Step 2: Switch to the orange, adding to the zig-zag shape, and then to the pink.

Drop Rubbing Alcohol On Design

Step 3:After completing the first section, use the eye dropper to cover the area with rubbing alcohol. This will make the ink bleed.


Continue Drawing And Bleeding Design

Step 4:Continue the three color zig-zag pattern, adding more rubbing alcohol as you move along.


Start New Row

Step 5:On the next row, change the direction of the pattern, but keep each coloured section lined up vertically so that they look like stitching.


Add Accent Lines


Step 6:In the empty spaces, add accent lines to complete the design and add cover them with rubbing alcohol.

Touch Up Design
Once the ink dries, touch up any areas that have bled too much with more marker lines


finished product:


from: http://www.teenvogue.com/fashion/diy/2013-01/ikat-ipad-case


Sunday, 13 January 2013

How to make a friendship braclet


  1. Choose several strands of embroidery thread in your desired colors. Embroidery floss is thicker than normal sewing thread and comes in many different colors. You must have more than one color to create a striped effect. The more strands you choose, the wider the bracelet (and the more visible the pattern) will be.

    How To Sing - Really Sing

     Breakthrough Method Releases Your Unique Voice! Watch Free Video Here
    www.thesingingzone.com
  2. 2
    Measure and cut your first strand. Measure a length of thread slightly longer than the distance from your fingertip to your shoulder, then cut it.

  3. 3
    Use the cut strand to measure and cut the remaining strands. You need to have at least 3 strings to make this bracelet, but you can have as many as you want. 4 to 6 will make a really skinny bracelet; 8 to 10 will make a thick one.

  4. 4
    Don’t feel obligated to make every strand a different color; using the same color multiple times will result in more (or thicker) stripes of that color depending on how you arrange them.

  5. 5
    Pin the bracelet to your pants while you make it. Tie all the ends of the threads together in a square knot and fasten it to something. There are various ways to hold the bracelet in place while you're making it:

  6. 6
    The most common method is to put a safety pin through the knotted end and then pin the bracelet to the leg of your pants (on your thigh) far enough away that, as the bracelet lengthens, it doesn’t start creeping up your torso.

  7. 7
    Some people leave a little extra thread at the beginning to tie around a toe. Toes can be convenient holders as long as you are flexible enough to reach them.

  8. 8
    Spread the threads out so that, from left to right, the colors are in your desired order. To make the knotted end of your bracelet less bulky, try not to cross the threads over one another too much.

  9. 9
    For additional flair, make several short braids in the bracelet before spreading the strands out to begin the pattern. Later, you can do the same thing at the opposite end to make the bracelet more interesting (not to mention easier to tie shut).

  10. 10
    Knot the far left thread (Strand 1) around the thread immediately to its right (Strand 2). Loop it over the front of Strand 2, then around the back, and, finally, up through the loop you’ve created. Pull the end to tighten Strand 1 into a knot. Repeat to make a second knot.

  11. 11
    As you knot Strand 1, hold Strand 2 taut; this way, you will tie Strand 1 aroundStrand 2, not with it.

  12. 12
    immediate right, moving horizontally across the entire row of threads. Use the same method outlined in the previous step for each knot. Eventually, you will have made knots of this color across the entire row.

  13. 13
    Repeat Steps 6 and 7 using Strand 2, tying the new knots below the existing ones. When you’re done, you will have made a second row of colored knots beneath the first.

  14. 14
    Continue knotting rows of knots across the threads until the bracelet is the right length. To make sure it fits well, try it on your wrist. There should be enough extra room that you can fit about 2 fingers in next to your wrist, since the bracelet can shrink in water and become too tight (although it will stretch back out when dry).

  15. 15
    Finish the end of the bracelet in braids if necessary. Be sure to make as many the second time as you did the first.

  16. 16
    You can also add charms or beads to the end.

  17. 17
    Tie the loose ends of your strings into a second square knot. Make sure that the knot doesn’t take up any of the length you need to wear the bracelet.

  18. 18
    Trim any loose ends. Your bracelet is now ready to give to a good friend!


  19. 19
    Finished.
    from :http://www.wikihow.com/Make-a-Friendship-Bracelet

be happy...


HOPE!!


Saturday, 12 January 2013

Polka Dot Cake from Bake Pop Pan


Polka Dot Cake from Bake Pop Pan


Will putting polka dots inside a cake work? How does one do that?
I conducted a little experiment to find out.

Perhaps you've seen these in the store lately and walked right by them.
Like I did. Countless times.

I kept asking myself, "Why in the world would I possibly need that
when I can roll a perfectly round cake ball with my own two hands?"
And then one night I had this great idea for an experiment.
(I always call them great ideas until they fail miserably.)
How about using them to put polka dots inside a cake?
Rather large polka dots. But polka dots all the same.
After researching cake ball pans a bit, I settled on this brand.
Mostly because makes 18 balls at once and my coupons at
Bed Bath and Beyond were begging to be used.
With tax and coupon, final cost was just over $16.

 I started with a white cake mix and made some of the adjustments
recommended in the instruction guide that came with the bake pop pan.
After dividing the batter in half, I further divided half of the batter evenly
between 6 bowls for tinting. The colors I used were AmeriColor soft gel
pastes in 113 orange, 107 lemon yellow, 164 electric pink, 162 electric green,
103 sky blue, and a mix of 130 regal purple/165 electric purple.
I used about 1/2 t. of each so that the colors would remain vivid after baking.

You can see the bright colors in the vents peeking through after the clamps were put on.
The instruction guide suggests baking at 350F for 25-30 minutes but that sounded WAY too long.
My goal was to slightly under bake them so that they wouldn't dry out too much during
the second bake time. They were done at 13 minutes in my oven.

The instruction guide also suggests spraying some non-stick baking spray with
flour on the outside of the vents. I failed to take their advice.
I was sure that only filling them to the rim wouldn't cause eruptions.
But I was wrong. Mini volcanoes.

The happiest surprise of the day was that the volcanoes were more like
little caps that popped off almost by themselves leaving the insides intact.

The mess on the outside was minimal after removing
the tops with no damage to the balls.

The pans are non-stick but do require a baking spray
with flour to help the balls bake evenly.
Clean up was fairly easy.

After some quality control and taste testing of the volcanoes, the experiment resumed.

I also ended up trimming the tiniest bit off the tops to make them rounder.
We'll see if that mattered later on.

The scraps.

 After adding just enough batter to cover the bottom of my prepared pans,
the cake balls were placed inside.
My original plan was to freeze the balls before this step
but I skipped it so they were room temp when they went in the pans.

The remaining batter was scooped over each ball to cover.
And into the oven they went. Looking rather more like dinner rolls than cake.
I didn't tap the pans or even the batter out  for fear of uncovering the balls.

I ended up using 2 white cake mixes for 3 six-inch rounds.
Long story. After trying to capture the steps on the camera, the half batch
of batter that I'd hoped to use to cover the balls was getting weird.
It had just set out too long. I baked it up in a small oval pan as a decoy
for my husband to keep him away from the real project.
Not a task for the faint of heart.

For the cake balls, I used the cake mix and pudding along with
the substitution of milk for the water per the instruction guide.
I did not decrease the liquid as suggested or increase the eggs but
went instead with the amounts on the cake mix box.
Since I'd used whole eggs for the cake balls, the remaining half batch
of batter had a yellow tinge. And there wasn't enough of it to cover the balls.
Yet another reason to use a second cake mix.
The second mix was mixed using the egg white method and
ingredients listed on the box except for about a teaspoon of almond extract.
Force of habit.
So I had a nice white batter to contrast with the bright colors.

The filled six-inch rounds baked about 30 to 35 minutes or until they pulled
from the sides of the pan and sprang back when touched lightly.
I didn't use the toothpick method for fear of stabbing a colored ball or hopefully
soon-to-be-polka-dot since the balls were already cooked and not a true gauge of doneness.

Waiting for them to cool and frost was like waiting for my water to break with my first born.
Okay. Maybe not quite that dramatic. But the anticipation was palpable in my kitchen.
I know, I know. Get a life.
You can see some of the color coming through in spots.
Never wanted to take a knife to a cake more badly in my life.
But I waited.

Off to the freezer to chill out and wait until the next day for a
crumb coat and slathering of white frosting.

The question mark seemed like a perfect accent to this cake since I still had no clue if this would work.

And then the giant cut to remove all doubt . . .

It actually worked!!! Hooray!

 The first slice left this design. Not all dots showing but they're in there somewhere.

After cutting the second large piece, all but one color magically appeared.
Perhaps placing one more ball in the pan would've produced a more even pattern.
Next time.
The colored balls stayed as moist as the rest of the cake even
though they were completely baked before hand.

recipe from:http://once-upon-a-pedestal.blogspot.com.au/2012/05/polka-dot-cake-from-bake-pop-pan.html